In the exhilarating world of Basketball Zero, your zone and style combo can truly elevate your gameplay to the next level. Understanding the nuances of each zone and how they synergize with different styles is crucial for crafting the ultimate build. Below, I've meticulously ranked all the zones and provided insights into the most potent zone and style combinations to help you dominate the court.
All Basketball Zero Zones Ranked
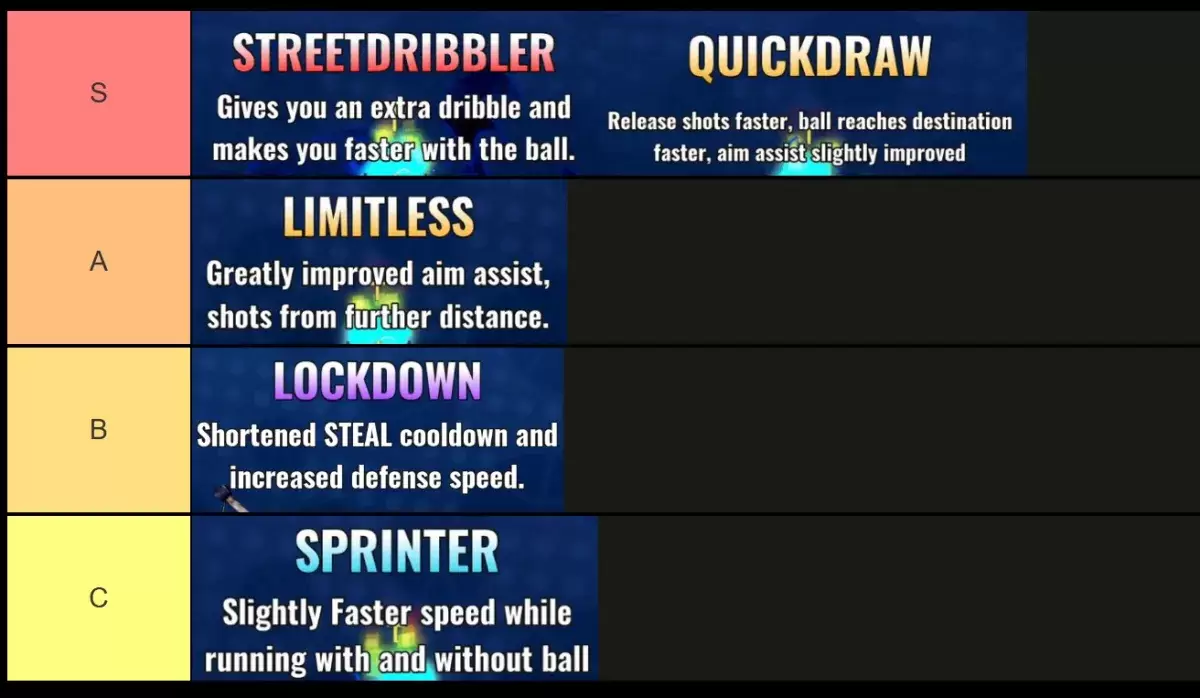
In the quest to identify the best zones in Basketball Zero, three stand out as the top performers: Street Dribbler, Quickdraw, and Limitless. These zones shine brightly depending on your chosen Style. While Sprinter holds immense potential due to its impact on movement speed—a critical stat in the game—it currently falls short of the A-Tier due to needing a buff. For now, both Sprinter and Lockdown find themselves in the lower tiers. Let's delve into the specifics and explore the best style/zone combos.
S-Tier Basketball Zero Zones
| **Name** | **Rarity and Roll Chance** | **Effects** | **Ranking Reason** | **Best Style Combo** |
| **Street Dribbler** | *Mythic (0.5% or 5% Lucky Odds)* | • Grants an extra dribble charge • Enhances speed with the ball | An extra dribble charge is a game-changer, serving as an unbeatable defensive strategy. Coupled with increased speed, you'll outmaneuver opponents and reach the basket faster, making Street Dribbler the top zone in *Basketball Zero*. | Star or Ace |
| **Quickdraw** | *Legendary (2% or 45% Lucky Odds)* | • Speeds up shot release • Accelerates shots and passes • Provides slight aim assist | Quickdraw ranks as the second-best zone due to its ability to release shots faster, making them harder to block. Faster passes and slight aim assist further enhance its utility, especially for players honing their shooting skills. | Ace or Phantom |
A-Tier Basketball Zero Zones
| **Name** | **Rarity and Roll Chance** | **Effects** | **Ranking Reason** | **Best Style Combo** |
| **Limitless** | *Legendary (2% or 45% Lucky Odds)* | • Boosts aim assist significantly • Extends range on shots | The extended shot range combined with powerful aim assist makes Limitless a formidable zone, particularly beneficial for beginners. However, as players master the shooting mechanics, the need for aim assist diminishes, relegating it to A-Tier. | Sniper or Ace |
B-Tier Basketball Zero Zones
| **Name** | **Rarity and Roll Chance** | **Effects** | **Ranking Reason** | **Best Style Combo** |
| **Lockdown** | *Epic (35% or 50% Lucky Odds)* | • Shortens the ball steal cooldown • Boosts defense speed | Lockdown excels with the Phantom style, enabling frequent ball steals and effective support play. While not as dominant as S and A-Tier zones, it remains a solid choice for those focusing on defense and team play. | Phantom for Support and Ace or Star for Carrying |
C-Tier Basketball Zero Zones
| **Name** | **Rarity and Roll Chance** | **Effects** | **Ranking Reason** | **Best Style Combo** |
| **Sprinter** | *Rare (62.5%)* | • Slightly increases speed with and without the ball | Sprinter's potential to ascend to A-Tier stems from its impact on movement speed, a key stat in *Basketball Zero*. However, the current speed boost isn't substantial enough, placing it in C-Tier, though it may reach B-Tier in specific scenarios. | All Except Sniper |
And that wraps up my comprehensive Basketball Zero zones tier list. To further enhance your gameplay, don't forget to check out our Basketball Zero codes for free regular and lucky spins, giving you more opportunities to land those coveted zones and styles.